

The ability to seamlessly redirect web traffic from one domain to another is more than just a convenience—it’s a necessity for good SEO and usability. However, not all domain forwarding services are created equal. One service that consistently falls short is offered by GoDaddy. In this post, I’ll explain why GoDaddy’s domain forwarding doesn’t work, and then I’ll explain a solution that circumvents these pitfalls by using a free account from Cloudflare.
Domain forwarding (also known as redirecting) serves multiple strategic purposes, such as:
- Consolidating Similar Domains: If you own domains such as example.net and wish to direct that traffic to a primary site, such as example.com, domain forwarding is a logical solution.
- Creating Vanity URLs: You can use a secondary domain, such as example.net, for marketing materials, such as video ads, and redirect visitors to a main website. This also allows you to append tracking parameters and query variables to redirected URLs for deeper analytics insights.
- Facilitating Mergers and Acquisitions: In scenarios where one company acquires others, say company-a.com acquires company-b.com and company-c.com, redirecting the acquired domains to the primary company domain (company-a.com) post-content migration ensures a unified online presence and the most strategic transfer of SEO equity for all individual URLs.
What I hope to explain here is that GoDaddy’s domain forwarding service doesn’t work for any of these purposes.
The Problems with GoDaddy’s Domain Forwarding
Only HTTP Works, Not HTTPS
GoDaddy does not support forwarding for the HTTPS version of a domain. This restriction primarily arises from the complexities associated with HTTPS requests, which necessitate some form of hosting (shared, virtual, proxy, etc.) to serve a valid SSL certificate. GoDaddy bypasses the necessary step of SSL certificate provisioning. Users looking to forward a domain from GoDaddy will find that while the HTTP version redirects successfully, the secure HTTPS version does not. This is the first significant problem with GoDaddy’s domain forwarding.
Limitations on Forwarding Paths Beyond the Root Domain
The second limitation pertains to GoDaddy’s inability to forward specific paths or directories within a domain. GoDaddy’s forwarding service is designed to redirect only the root domain, excluding any subdirectories or file paths. For instance, although GoDaddy’s domain forwarding works for http://example.com, adding a path or directory to the domain (e.g., http://example.com/services/) results in a 404 error. Direct requests to specific pages or resources within a forwarded domain will always result in a 404 error. This is the second significant problem with GoDaddy’s domain forwarding.
Examples of GoDaddy’s Domain Forwarding
Let’s review the status of several requests to determine what’s happening with GoDaddy domain forwarding. For the purposes of demonstration, I’ll configure domain forwarding for empiricaldigital.net. I purchased this domain at GoDaddy and I’ll like to forward it to this domain (empirical.digital). Here’s how I’ve configured domain forwarding in GoDaddy:
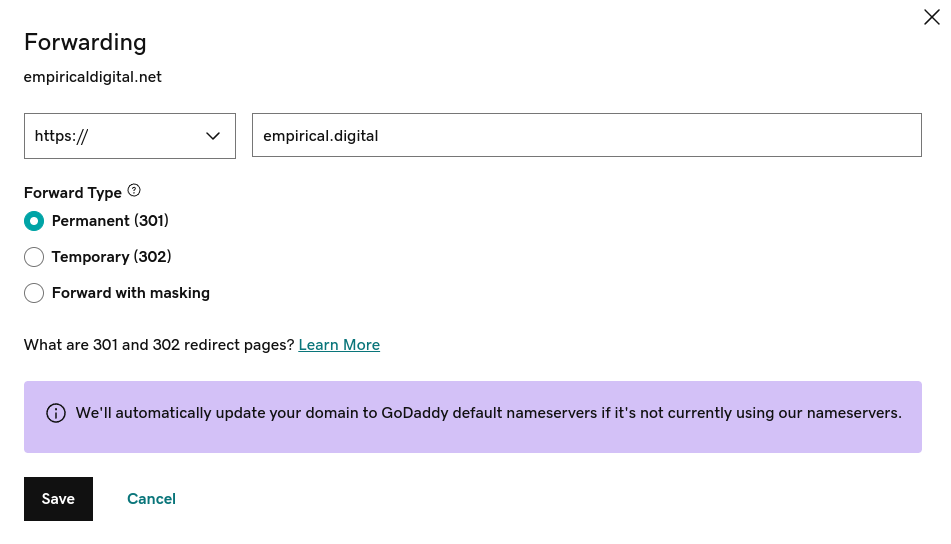
Here’s what happens when I request the following:
- http://empiricaldigital.net: I get a successful 301 redirect to https://empirical.digital.
- https://empiricaldigital.net: I get a connection timeout.
- http://empiricaldigital.net/testing/: I get a 404 “not found” error.
- https://empiricaldigital.net/testing/: I get a connection timeout.
Note: after writing this post, I disabled domain forwarding. If you test the URLs listed above, you’ll get different results.
These results make me wonder why GoDaddy even offers domain forwarding. It doesn’t work. This is why I never recommend using it.
The Solution: Use a Free Cloudflare Account Instead
The easiest way to forward or redirect a domain registered at GoDaddy is with Cloudflare. Your domain can be registered at GoDaddy, but you can have the DNS information and domain redirection handled by Cloudflare. They even set up an SSL certificate for you. (This also works for domains purchased through other registrars; they don’t need to be registered at GoDaddy.)
Before we proceed, please note that we’ll be editing DNS information. If you’re not comfortable doing that, you should probably forward this information to someone who is.
You can configure a domain to forward through Cloudflare by following the steps below:
- Visit https://www.cloudflare.com/
- Create an account. You’ll need to verify your email address.
- To get started, you’ll need to add a site. Use any of the following buttons:
- If you already have an account, you should see an “add a site” button when you log in:

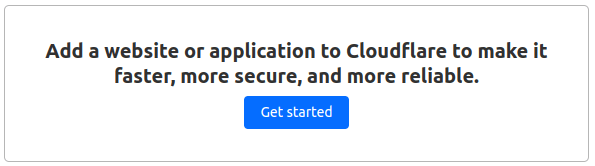
- If this is a new account, you should see a block asking you to “get started” by adding a new site:
- There should also be an “Add site” button in the top navigation.
- If you already have an account, you should see an “add a site” button when you log in:
- Enter in the domain name you’d like to forward and hit “continue”:

- Select the “free” version of Cloudflare. You need to do this for every domain you set up with Cloudflare. Cloudflare will then review your existing DNS records, including TXT, SOA and MX records. They’ll migrate all of these automatically, which is great if the domain is still used for other purposes such as email, Google Apps, etc. Review the DNS records and select “continue.”
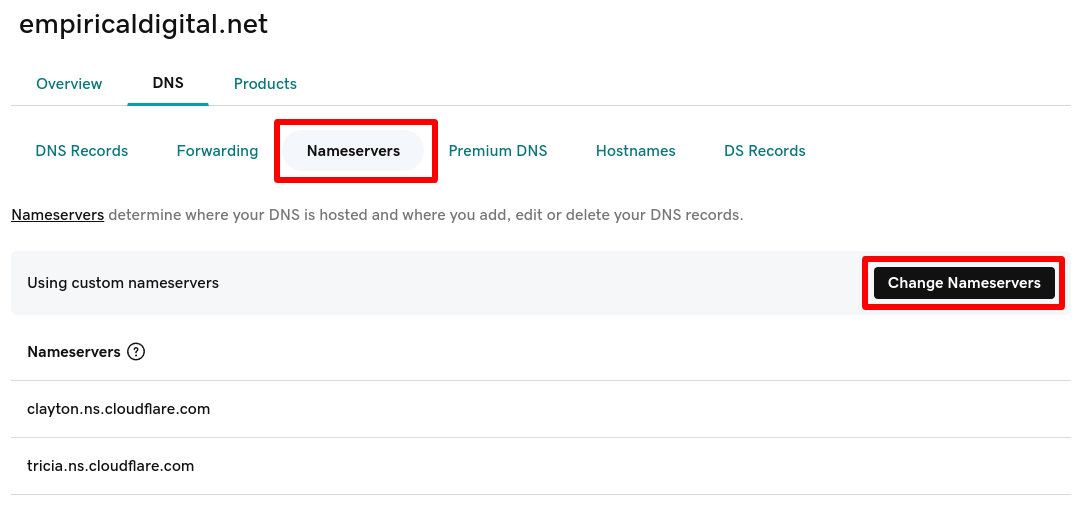
- Cloudflare will then provide you with nameserver information that needs to be entered at GoDaddy. These nameservers will look something like the following:

- To edit this information at GoDaddy, login to your account, view the domain name, edit DNS information, click on the “Nameservers” tab, click “Change Nameservers,” and enter the nameserver info provided by Cloudflare. The edits will take a minute or two to be reflected on the page:
- Back at Cloudflare, click “continue” to indicate that you’ve updated the nameservers. Cloudflare will most likely give you a few options related to this domain name, such as automatically rewriting HTTP requests to HTTPS. Configure these as desired.
- You should now be able to view your DNS information at Cloudflare.
- If you have existing “A” records, delete them.
- Create two new “A” records, one for your domain (“@”) and one for all subdomains (“*”). The IPv4 addresses don’t matter because we’ll redirect these requests anyway. Also, make sure these are “proxied”:

- If you get an error while saving proxied “A” records, try typing in a few different IPv4 variants.
- Now, to redirect the domain, use the lefthand navigation to go to “Rules” -> “Page Rules.”
- Click the “Create Page Rule” button and enter the following:
- URL: *old-url.com/*
- Pick a setting: “Fowarding URL”
- Select status code: “301 – Permanent Redirect”
- Enter destination URL: https://new-url.com/$2
- Here are the settings I used:

- Click “Save and Deploy Page Rule.”
These changes most likely won’t work immediately. It will take at least a few minutes, and could take as much as a few hours. Your edits at GoDaddy need to propagate, and Cloudflare needs to setup an SSL certificate for your domain. Regardless, this should result in your domain correctly forwarding and redirecting, including both HTTP and HTTPS versions, and including all page paths.